Friday, March 28, 2008

SCCM updates deployment : : unable to evaluate assignment

Last week I was deploying an SCCM SW update feature, I did it before a lot of times so I thought I was easy, I did everything, deployment template, package, update list, WSUS gpo, everything, and deployed a security hotfix to a test server and oops. It won’t get deployed.


Some logging revealed the following warning message at the client updatesdeployment.log unable to evaluate assignment GUID as it is not activated yet


I spent 2 hours trying to figure out the problem, then went to launch J, spending other 2 hours at launch J. Then get back to find that the update is deployed, at first glance I thought it was related to the GPO settings as it was scheduled to run at 3 AM and the update deployed at 3 PM exactly so I thought was something is going on.


After some advises from the great SCCM people, I found that the deployment plan is configured to run at UTC time, since I had + 4 hours ahead UtC and I created the package at 11 am it get deployed at 3 PM J.


So to force the update to occur at the specified time you have to make sure that the schedule is set to the local client time, or make sure to calculate the UTC + and -.


Next week I will be deploying SCOM SP1, so we will talk a lot about SCOM… c ya

Tuesday, March 25, 2008

Design SCCM 2007 in multiple forests deployment

  • I have collected this from here and there, I had the chance to plan a deployment in 4 forest network, SCCM was deployed in central forest, and clients will be distribute across other 3, so I decided to go with mixed mode secondary site in each forest, so here is the design/configuration notes:
  • 1.1 External Forests Design:
  • Deploying Configuration Manager 2007 across multiple Active Directory forests, plan for the following considerations when designing your Configuration Manager 2007 hierarchy:
  • · Communications within a Configuration Manager 2007 site
  • · Communications between Configuration Manager 2007 sites
  • · Support for clients across forests
  • · Configuring clients across Active Directory forests
  • · Approving clients (mixed mode) across Active Directory forests
  • · Roaming support across Active Directory forests
  • · Cross-Forest Communications between Configuration Manager Sites
  • Data is sent between sites in a Configuration Manager 2007 hierarchy to enable central administration within a distributed model. For example, advertisements and packages flow down from a primary site to a child primary site, and inventory data from child primary sites are sent up to the central primary site. This information is sent between site servers in the hierarchy when the site communicates with a parent or child site. Data sent between sites is signed by default, and because sites in different Active Directory forests cannot automatically retrieve keys from Active Directory, manual key exchange using the hierarchy maintenance tool (Preinst.exe) is required to configure inter-site communication.
  • When one or more sites in the Configuration Manager 2007 hierarchy reside within a different Active Directory forest, Windows user accounts has to be configured to act as addresses for site-to-site communications except in the following scenario:
  • Important
  • All Active Directory forests are configured for the forest functional level of Windows Server 2003 and have a two-way forest trust
  • The same design concept applied to branch offices will be applied to forests, it is recommended to have a secondary site in each forest with clients less than 200 and child sites for client with more than 200 clients.
  • Note
  • Distribution point cannot be installed by itself in remote forest.
  • 1.1.1 Client assignment in multiple forests:
  • If the clients will not roam from one forest to another during the assignment process, then you can extend the AD schema in your new forest and the clients in this forest will find their site and assign successfully (on the assumption that they all domain-joined and not workgroup computers). If the clients are the network in the original forest during assignment, this won't work - they will need to obtain site information from a SLP.
  • Once assigned, clients in the second forest then need to find their default management point. If they are on the second forest network and the schema is extended, they will find their default management point from AD. However, if they are on the original forest network, locating the default management point via AD will probably fail (although I'm not 100% sure of this - could they locate a GC server in their own forest?), and they will need an alternative mechanism - which could be DNS, or SLP, or WINS.
  • For the clients in order to be assigned the following must be configured correctly:
  • · Boundaries must not overlap between sites.
  • · Extended AD in each forest.
  • · Make sure that you have a SLP for the hierarchy (central site) and that clients can locate as their backup mechanism for service location (easiest way is to assign it during client installation)
  • · Make sure that DNS resolves all server names between the different namespaces (eg forwarders, stub zones, or root hints)
  • · Configure DNS publishing for the default management point, and specify the DNS suffix for the client during installation
  • With this combination, clients will try to use their local AD for site assignment and locating a management point. If this fails, they will use the SLP for site assignment, and DNS for locating the management point.
  • 1.1.2 Accounts and Security requirements:
  • In order to allow the communication between sites in different forest the following criteria has to be met:
  • · All Active Directory forests are configured for the forest functional level of Windows Server 2003 and have a two-way forest trust.
  • · Sender address accounts to use domain user accounts that are valid within the target forest to enable site-to-site communication.
  • · The sender account has to be local administrator on each server with child site role installed.

Monday, March 24, 2008

Monitoring Exchange SP1 with SCOM

Hello,

If you have noticed, some of you after applying SP1 will not be able to collect some performance data and get alerts as before, A some DB performance counters has been changed is SP1, this caused performance data not to be collected so here is what is going exactly. As far is reported the only performance counter object that was changed in SP1 was the Database object, which was renamed to the MSExchange Database object (affects mb, hub transport, edge transport roles). A list of where these counters appear is below.  the alerts customers could be missing would be the ones generated by the monitors. Obviously the views and data collection rules do not work either.


In terms of workarounds for this, you could disable the 2 rules and monitors and create a separate MP where the rules collect the “right” performance counters and the monitors take configuration from the rules. You’d need to do the proper targeting, but the MP classes are declared as public, so you could refer to them from another MP.


Note that for the updated MP, we will look for the updated (SP1) counters only, i.e. the customers could expect seeing similar types of behavior from their monitored Exchange 2007 RTM servers.

Rules

Collect__Database__I_O_Database_Reads_Average_Latency__Report_Collection_._5_Rule

Collect__Database__I_O_Database_Reads_sec__Report_Collection_._5_Rule

Collect__Database__I_O_Database_Writes_Average_Latency__Report_Collection_._5_Rule

Collect__Database__I_O_Database_Writes_sec__Report_Collection_._5_Rule

Collect__Database__I_O_Log_Writes_Average_Latency__Report_Collection_._5_Rule"

Collect__Database__Version_buckets_allocated._5_Rule

Information_Store__Version_buckets_allocated___Red_2000_._5_Rule"

Information_Store__Version_buckets_allocated___Yellow_1800_._5_Rule"


Monitors

Information_Store__Version_buckets_allocated___Red_2000_._5_Rule.AdvancedAlertCriteriaMonitor (takes data from the rule with the same name)

Information_Store__Version_buckets_allocated___Yellow_1800_._5_Rule.AdvancedAlertCriteriaMonitor (takes data from the rule with the same name)


Views

Microsoft_Exchange_Server_Exchange_2007_Mailbox_Information_Store_Database_I_O_Database_Reads_Average_Latency

Microsoft_Exchange_Server_Exchange_2007_Mailbox_Information_Store_Database_I_O_Database_Reads_sec

Microsoft_Exchange_Server_Exchange_2007_Mailbox_Information_Store_Database_I_O_Database_Writes_Average_Latency

Microsoft_Exchange_Server_Exchange_2007_Mailbox_Information_Store_Database_I_O_Database_Writes_sec

Microsoft_Exchange_Server_Exchange_2007_Mailbox_Information_Store_Database_I_O_Log_Writes_Average_Latency


Sunday, March 23, 2008

SCOM: exchange management pack new CustomOwaUrls key

Hi,

I am in the airport now, I just wanted to give you a quick ip, the new Exchange management pack for SCOM is not looking for the old customurls key, it is looking for the CustomOwaUrls, so beware of that a it might trick you.


Wish me a safe trip.

Friday, March 21, 2008

what to do: parent/child domain trust is lost, TDO object is corrupted

Here is a nice tip.

We had a lot of issues where customer is losing the parent/child trust, this is caused by a lot of reasons, either a corrupted TDO object, faulty AD or an admin who is playing with the wrong tools, so here is 2 things to do:

-          Search the TDO about similar accounts with the same name that may cause the trust to be lost and remove them:

o   Use the ldifde -r (saMAccountName=domainname*)

o   Check the ldifde dump for the accounts that has the same SAMACCOUNTNAME of the domain and might be conflicting with the TDO object “don’t ask what causes that”

-          Now delete the trust from the parent domain and from the child domain. You might need to delete the TDO object, those are here:

CN=Childdomain$,CN=User,DC=parentdomain,dc=com
CN=childdomain,parentdomain.com,CN=System,DC=parentdomainl,dc=com

-          Make sure that changes has been replicated.

-          For the parent domain do the folloing command : netdom trust childdomain.parentdomain.com /domain:ttsl.com UserD:parent_admin /PasswordD:*
/UserO:child_admin /PasswordO:* /add

-          Make sure that changes has been replicated.

-          Not sure from the restart requirement, in my case I had to reboot the PDC

Monday, March 17, 2008

Exchange 2007 issue : digitally signed message cannot be verified in outlook

I just want to highlight to your note a new bug just reported couple of hours ago, if you send digitally signed emails and you have Edge server with attachment filtering enabled, the message will be delivered with “the message cannot be verified” errors, so you will have to disable the attachment filtering to be able to deliver the message successfully.


Just wanted to highlight this as you might get that error, this will be fixed in rollup update 2 for SP1


Sunday, March 16, 2008

How to seed SCR copy offline for large DB size

A recent question has been raised by a lot of consultants and customer, how we seed an SCR target over the WAN, with a huge DB size “whatever the size is”, the clear question is doing offline seeding by taking the DB offline, copy the EDB file to the remote location and mount the DBm, but this poses a new challenge by talking the DB offline during the seeding process which might take ages and ages.


The answer is simple, you don’t have to keep the DB offline, in fact you don’t have to keep the DB offline at all if you use the TargetPath parameter with Update-StorageGroupCopy, you don’t need to take the source offline at all).  See http://technet.microsoft.com/en-us/library/aa998853(EXCHG.80).aspx for details on Targetpath.


In general this is how to do it,copy the edb file locally either manually or using the targetpath switch “you don’t need to take the DB offline if you used the switch”, mount the DB, move the edb to the remote location, start the replication and seeding should start.

Thursday, March 13, 2008

SAV mail security corrupt Exchange 2007

We had an issue recently where the customer installed SAV mail security 5.0 on his exchange 2007 server, after installing it, OWA stopped working, user’s couldn’t login using outlook anywhere,  Answer was Symantec Mail Security 5.0 was using 32 bit, and the server was 64 bit.  By installing Symantec Mail Security it moved the OS to a 32 bit and changed all the permission right for IIS, .NET  and OWA.  Microsoft used a script to covert it back to 64 and recreated IIS, .NET and OWA.  All work and still working just fine.

Wednesday, March 12, 2008

Exchange Wizard level

Well,

This is an old news “2 weeks actually” but I have gained 300000 points from Experts-exchange.com in the Exchange server zone only, actually I am from the top 15 player but because I am so busy I cannot become from the top 5.


This is so important step looking forward to the sage level. J


By the way I am on the top of the OCS section.

Using SCOM SP1 to manage SCOM RTM

Well,

I am afraid this is cannot be done, if you try to do that you will get an error state that you tried to connect to server with version not supported, so you will have to use the RTM console to manage the RTM version and the SP1 versions to manage the SP1 version

SCOM 2007: Error in ADMP

A customer has imported an ADMP, and soon after running it, he started to get the following error:

AD Replication Monitoring : encountered a runtime error. Failed to obtain the InfrastructureMaster using a well known GUID.

The error returned was: 'Failed to get the 'fSMORoleOwner' attribute from the object 'LDAP://SERVERNAME/'.

The error returned was: 'There is no such object on the server.' (0x80072030)' (0x80072030)


To solve this issue follow the below steps:

1. Run Adsiedit.msc
2. Connect to the DC=DomainDnsZones,DC=xxx,DC=xxx ,DC=xxx partition.
3. Open the properties for the Infrastructure object.
4. Look at the fSMORoleOwner attribute and it is set to CN=NTDSSettings\0ADEL:ed7c8fe9-c5cd-4101-bf57-7468c606a6be,CN=IOWADC4\0ADEL:ecaeecd1-dea1-44ac-9a3c-fb827fd6d085,CN=Servers,CN=Default-First-Site-Name,CN=Sites,CN=Configuration,DC=xxx,
DC=xxx
5. If this particular record is set to delete, then remove the above entry and then add the correct attribute for the current FSMO role holder.

Thanks to MCS SA for sharing this info that made my life easier.

SCOM 2007 How to remove discovered objects

Suppose that you have discovered an object and you want to delete this object from SCOM 2007, in SP1 In SP1 there is a new cmdlet that can be used to force the removal of discovery inventory (for example after you override a discovery for a particular object): Remove-DisabledMonitoringObject.


Tuesday, March 11, 2008

Exchange2007 and OCS on the same server

Well, to install OCS on x64 system you will need to run the following command in order to run CWA and enable OCS services to mount:

CSCRIPT %SYSTEMDRIVE%\Inetpub\AdminScripts\adsutil.vbs SET W3SVC/AppPools/Enable32bitAppOnWin64 1

Then restart IIS and maybe the OS, this is because OCS CWA dlls requires to run in IIS x86 mode, so what I think that happened that someone did the following script which configured IIS on x64 system to run in x86 mode. But if do that on E12 server than has the CAS role installed this will blow its mind you will get the error: 2274 W3SVC-WP ISAPI Filiter ‘C:\Exchsrvr\ClientAccess\owa\auth\owaauth.dll’ could not be loaded due to a configuration problem. The current configuration only supports loading images built for a x86 processor architecture.

, so you will have to set back the flag to 0, then uninstall OCS, so I think that installing both of the applications is not working thus not supported.

OCS/E12 and CCM


This is my configuration notes for configuring OCS2007/E12 and Cisco Call manager, I did a test lab “thanks to Jaison Jose and Sheif Tawfik” and we came up with the following results:
- Integration was for simple, configuring the CCM as a GW for the mediation server was very enough to do phone calls.
- To do phone to PC call, you will need to configure a SIP trunk and add phone route plan to it.
- I did dual forking configuration and it worked, I didn’t find any document that explains how to it in details “If someone has such a guide please send it”, but after little testing I found that enabling enterprise voice with Pbx integration and configuring the server URI to be (user@domain.com “Sip Name’), and the Tel URI to be (tel:xxxx “where xxxx is the telephone extension) did the trick for call coming from OCS to user “Note that we will use single extension in this case.
- Missed call notification get delivered to the user’s mailbox in the phone to PC, PC to phone, and dual forking.
- To do dual forking for calls coming to from phone to PC, we need Cisco unified presence server, this is very new Cisco product, attached the CUPS document “we will try to set this up next week”
- User’s phone numbers has to be in E.164 format in AD, redirecting the calls to CCM directly fails in this case because CCM fails to remove the + , so calls need to be forwarded to the Voice gateway first “we need to test that next week”.
- To have CCM/OCS integration you will need to have a SIP trunk between the Mediation server GW facing NIC and the CCM, otherwise it will not work (calls will get service unavailable errors).
- To have Voice-mail auto redirection (a phone missed called redirected directly to the extension’s Voice mail) you will have to enable caller-ID on the SIP trunk, otherwise the user will get an auto-attendant.
- For Auto-attendant feature in Exchange, just create a new auto-attendant as voice enabled, assign an extension and create an Extension routing rule on the CCM to redirect the call to the Exchange feature and it will work.
- To do presence integration you will need CUPS in-place, we didn’t have the time to test that.
- Feature that has been tested successfully:
1. PC to phone calls
2. Phone to PC calls.
3. Dual forking (from calls coming from OC).
4. Multi-group conferencing (OC – Phone – phone).
5. Voice mail and missed call notification.
6. Call forwarding to phone, PC and VM.
7. OVA

Monday, March 10, 2008

Softgrid sequencing hard coded applications

These steps will help you to sequence applications that is hardcoded to be installed on C Drive, I have tested and it works perfectly.


Follow the steps below to complete a Sequence for an application that installs to C:\


1. Restore a clean image with the current Microsoft SoftGrid Application Virtualization Sequencer software


2. Map any network drives to installation files, home directories, and / or any network share needed to run the application


3. Close all Windows Explorer or Command Prompt windows


4. Execute the Sequencer software and select File to New Package


5. When prompted if you would like some assistance select Yes


6. On the Welcome to the Package Configuration Wizard select Next


7. Provide a Suite Name and complete your Comments field with details about the package, the sequencer, base operating system, block size, and any other information you deem necessary


8. Enter the name of your Microsoft SoftGrid Application Virtualization Server in the Hostname field replacing %SFT_MICROSOFT SOFTGRID APPLICATION VIRTUALIZATIONSERVER% and enter a subdirectory of the \content directory in the Path field where the SFT file will be placed. Select Next


9. Select the values for your supported client operating systems, Select Finish


10. On the Welcome to the Installation Wizard page select Next


11. Set your Sequencing Parameters such as Compression Algorithm and Block Size and select Next


12. Click on Begin Monitoring to put the Sequencer monitoring process into the background


13. Create a directory on the drive letter that will be utilized by the Microsoft SoftGrid Application Virtualization client as it's virtual drive (typically Q:\). This directory should follow 8.3 naming standards and be unique (e.g. Q:\AppName.v1)


14. Execute the setup program for the application to be Sequenced


15. During the installation of the application install the application to the C:\ drive and appropriate directory as required by the application


16. Perform any manual post installation configurations (e.g. ODBC connections, service packs, etc.)


17. Click Start to Run and enter the path to the applications executable on the C:\ drive


18. Click OK to run the application


19. During the Installation phase of the Sequencing it is important to test and configure the application. It is recommended to execute the application multiple times during this phase


20. Exit the application and bring the Sequencer to the foreground


21. Click Stop Monitoring to complete the Installation phase


22. When prompted to select the Primary Installation Directory of the application navigate to and select the directory you created on the Q:\ drive in step 13 (e.g. Q:\AppName.v1). This will copy the entire application's assets to the Q:\ drive's VFS


23. If you have another application to install or want to run the application again to configure a setting select Begin Monitoring, otherwise select Next

Module 10: Advanced Sequencing 323 Microsoft SoftGrid Application Virtualization Administration Training Guide©


24. On the �Add Files to the VFS screen browse to and select any files that need to be manually added to the VFS. Select Finish


25. On the Application Wizard Welcome Screen select Next


26. On the Select Shortcuts screen Select Edit and Browse to the location of the executable on the Q:\ drive (e.g. Q:\AppName.v1\VFS\...\app.exe) Note: Do not select the application from the installation directory on C:\


27. Correct any errors on this screen before selecting Next


28. Select the Shortcut for the application executable on Q:\ and select Launch to execute the application from the VFS


29. While in the application perform your �top 10 actions to create the proper Feature Block 1. Once done, close the application. You should be returned to the Launch Shortcuts Window, Select Next


30. On the Sequence Package Window select Finish


31. Select File to Save


32. Name the file (e.g. AppName.sprj) and save it a folder on your desktop


33. If necessary modify the OSD file to reference the correct Microsoft SoftGrid Application Virtualization server and proper working directory (e.g.<WORKINGDIR>C:\directory</WORKINGDIR>) and save it


Installing FCS on workgroup computer

You can install the FCS client on workgroup computers, of course this poses a lot of issues and challenges that you have to handle, the important things to cover is:

-          Updates, you will have to use internet updates not WSUS, or you will have to import WSUS configuration in the local policy.

-          You will install the FCS client using the /nomom switch, which will remove the MOM issue, but you cannot manage and report them from MOM. Disabling the Mutual authentication will not fix the issue.

-          Policies, you will have to do that using registry key to apply the required settings.

Check the FCS documentation for list of settings has to be maintained and how it is done using registry.


Mahmoud

SQL 2000 running on x64 windows in not monitored

Yes this is true, SCOM cannot monitor x86 version of SQL running on x68 OS, x64 SQL 2000 version running on x64 OS but it will not monitor x86 version of SQL running on the x64 OS so if this happened to you ,you will have to move the SQL version to x64 version. Or better upgrade to SQL 2005.

Mahmoud

Building active/active SQL cluster- Part2

In this session we will continue illustrating how to build an active/active SQL cluster, we built the cluster in the last session, we will install the SQL cluster in this session.
i prefer that you copy the installation source files to the local harddisk, i have experienced some faulty CD and hardware in my work, and it it will cause a lot of time to fix the corrupted installation specially in cluster environment.
so let us begin:
before you start in the SQL cluster installation you have to create a named instance pipe on each node for each named instance you will install, this is a very important  step or the installation will fail.
To create a named pipe fpr the installation follow steps in the following KB:
Install SQL in ACTIVW/ACTIVE cluster environment:
- from the SQL installation source double click on setup.exe.
 
- In the Welcome creen, click on SQL server 2000 components
 
- In the install component screen, click on Install database server.
 
- In the welcome screen, click next.
 
- In the licensing screen, enter the administrator name and organization name,Click Next.
 
in the installation option, enter the first virtual server name "DBVS1".
in the fail over clustering page, enter an IP that will be associated with the failover cluster,Click Next.
 
in the cluster disk selection, seelct a disk that SQL data file will be installed on,Click next.
 
in the cluster definition, be sure to select both nodes to be included in the cluster configuration,Click next.
 
In the Remote Information page, enter a valid administrator credentials,Click Next
 
 
in the instance name clear the default instance checn box, be sure to installed a named isntance as we identified in the named pipe before, because there is could be only one default instance on the cluster server.
 enter an instance name i chose (NI1), Click next.
in the setup type, choose custom, click next.
 
In the select components, clear the bookonline, and development tools.
 
in the service account, enter a valid user name and password which the SQL service will runder it's credentials.
 
in the authentication mode, select windows authentication (unless you will run application using SQL authentication), then click next.
 
in the collation setting, click next
 
wait until the setup finish, verify that the SQL cluster installed succesfully. the installation of the second node is typically similar to the first node instalaltion, but you will chose a diiferent virtual server name and different instance name (i chose DBVS2, NI2).
after that designate one server for a SQL virtual server, and designated the other node for the other VS and NI.
have fun


Exchange 2007 back pressure feature

I have installed exchange 2007 from ages ago, but as usual i decided to put E12 under a high pressur to see how it will behave.

i installed E12 over a Single processore dual core 3.4 GHz machine with 2GB of RAM, i used vritual server and assigend full resources for that machine

to start by lab environment i decided to assign the E12 only 256 MRAM to see what will happen, well it started and worked fine for about 5 Minhttp://www.maktoobblog.com/FCKeditor/editor/images/smiley/msn/smily_1.gif then mail flow stopped, and internal and external messages stucked in the drafts folder.

i didn't know why but tried to investigate about it, a quick review for the application log indicated some warning messages

-----

on: The resource pressure is constant at High.

Statistics:
Statistics

-----

on: Private bytes consumption changed from Previous Utilization Level to Current Utilization Level.

Statistics:
Statistics

-----

so after a small search i found that there is a new feature of E12 called back pressure, it helps E12 to avoid cases when low resource are available and mail keep incoming and exchange was usually falls in a black hole and a reboot was always the only solution.

i found that to disable this feature you have to open  EdgeTransport.exe.config application configuration file that is located in the C:\Program Files\Microsoft\Exchange Server\Bin directory edit the value of

EnableResourceMonitoring  to be false. only do that in lab environement.

also i found that there is a good documentation of the back pressure featue included in the updated exchange help file, so i was reviewing the old help file so download the new one and check about it under trasport architecture


Autodiscovery and commercial certificates error in exchange 2007

When you install the Client Access server role on a computer that is running Exchange 2007, a new virtual directory named Autodiscovery is created under the default Web site in Internet Information Services (IIS). T

his virtual directory handles Autodiscovery service requests from Outlook 2007 clients and supported mobile devices in the following circumstances:

- When new user account is configured or updated

- When a user periodically checks for changes to the Exchange Web Services URLs

When underlying network connection changes occur in your Exchange messaging environment.Additionally, a new Active Directory object named the service connection point (SCP) is created when you install the Client Access server role.The following figure illustrates how a client connects to a Client Access server the first time from inside the Exchange messaging organization.

 If you are using the new outlook 2007 client, the client will use the HTTPS based distribution method for distributing OAB,GAL,OOF and free/busy information. Microsoft decided to use the HTTPS method to overcome the issues related to the difficulties appeared in managing public folders. Exchange always using secure communication with clients and servers for example it always uses SSL, Secure SMTP and secure RPC. 

If you are using the default settings in Exchange 2007 you will not have any problems, however the default setting is not enough for most organization, because you might want to use a commercial certificates for securing the SMTP or HTTP traffic and this is where the issues arises, because you will encounter an error when using Autodiscovery, OAB, OOF or any HTTP/S web service because if we bind an commercial SSL certificate with an external name to the Exchange 2007 server, users will experience an error message when using Autodiscovery URL,OOF URL and OAB URLs indicating that either object doesn't exist or connection failed when connecting to those URLs internally because users will connect to those URLs using the Internal FQDN obtained the SCP (service connection points) located in the Active directory, while IIS is configured to use SSL certificates that use FQDN with the external name of the servers and thus the connection will fail, be ware of 2 points:

-          This issue will not occur of you are not using split DNS infrastructure.-          Commercial certificate providers don't issues certificate with internal FQDN names like ( .local or .dom) So how to solve it, there is so many ways o solve it as following:

-         if you are using a certificate from a provider that allow multiple SPN names to the certificates (which most of certificate providers don't allow) you can use the following CMDLET to create a certificate request with multiple SPNs: New-ExchangeCertificate -generaterequest -subjectname dc=com,dc=Synergyps,o=Synergyps Corporation,cn=exchange.Synergyps.com -domainname CAS01,CAS01.exchange.corp.Synergyps.com,exchange.Synergyps.com, ,autodiscover.Synergyps.com -path c:\certrequest_cas01.txt

-         if you are using a commercial certificate from Verisign or  Godaddy the above method will not work, so to work around it you can use the following CMDLET to update the SCP inside of the AD: Set-WebServicesVirtualDirectory -Identity EWS* -ExternalUrl Https://mail.synergyps.com/EWS/Exchange.asmx -InternalUrl Https:// mail.synergyps.com/EWS/Exchange.asmx.-         the previous command will update all of the services (OAB,Free/Busy,OOF,GAL) address, but if you are interested in updating the Autodiscovery SCP only you can use the following CMDLET: Set-ClientAccessServer -Identity CASserver1 -AutoDiscoverServiceInternalUri https://mail.synergyps.com this will allow you to use a commercial certificate along with your secure deployment of exchange 2007 and avoid the common errors most of the customers complained from when using AutoDiscovery service.


Moving MOM database ot different SQL server

I had a call from a customer last week, he called me to move his MOM database from the current partition a new SAN allocated disk space, it was easy "I guessed" a simple attach and detach thing, however when I reached the customer location and met the team i found that they want to move the database from the current SQL server which is the MOM server, to a new Active/Active SQL cluster.

I done this before but never move the SQL database to new SQL active/active cluster I was a little scared because the SQL cluster was holding all of the databases of that customers application use(about 2 terabyte of data) and holding his application (7 international subsidiaries are using it) so i was very careful specially that they wanted me to work on the fly and no testing.

I did it and it went "almost" smoothly , i will post a step by step guide later on how to do it.

so visit the blog later and you will find it.


Building Active/Active SQL cluster-part1

I have searched the internet for a detailed guide on how to implement SQL active/active cluster, I have implemented it couple of time before but It was so strange not finding a detailed and clear guide, most of the current articled that speaks about the subject either talking about windows 2000 clustring, or talking from a general prospective. So If you are looking for a detailed guide this one for you.
I will not talk about how to Virtualize the environment or configuring SAN/NAS there is a lot of documentation that talks about the process for VMWARE and Microsoft virtual server 2005. I will assume that you have configured every thing.
The storage is configured so that one partition for database file for instance1 and one partion for logs, the same applies for instance 2.
I will start from the building the cluster. Some of you will notice that I have removed the  domain name, this is because I used a customer real domain while capturing the screen shots, so I have removed the domain name but all you have to do is to put your domain name.
Let us start
open node 1 and open the cluster administrator and choose to create a new cluster
 
 
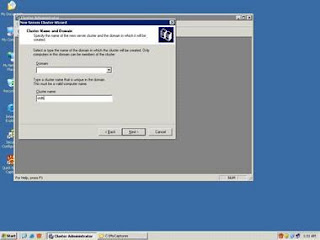
in the cluster name specify the cluster name "in my case otdb", click next
 
 
in the computer name select hte first node PC, click next.
 
in the Ip address specify the IP address for the Cluster, click next.
 
in the cluster service account spcify the account shich the clsuter service will run under it's priviledge ( i highly recommend that you create a special account for the cluster service and don't use an administrator account) ,click next
 
in the quorum disk select the disk which will hold the quorom in my case i chose the E drive and clik next
 
after the wizard finshes configuring the cluster on the first node open the cluster administrator and verify the succesfull installation.
 
to add the second node to the Cluster group:
from the File Menu, select new, and select Node:
 
in the add new node wizard select next.
 
in the computer name field, type the computer name or browse for the computer, add the computer using the add button, and click next.
after the analyzing configuration wizard finishes, Click next.
 
in the cluster service account page, specify the cluster service account password, click next:
 
the wizard will configure the second node and will join it to the existing cluster. there is some ocnfiguration are required for QA the cluster configuration, a etailed list of the QA procedure could be found here:
this is part one, i will continue in the part 2 in building the active/active cluster configuration.